Showing posts with label black. Show all posts

Saturday, December 13, 2014

BLACK FAUX LEATHER CLUTCH DIY


Are you still looking for that perfect handmade gift?  With Christmas right around the corner, you need a DIY that’s fast and easy but 
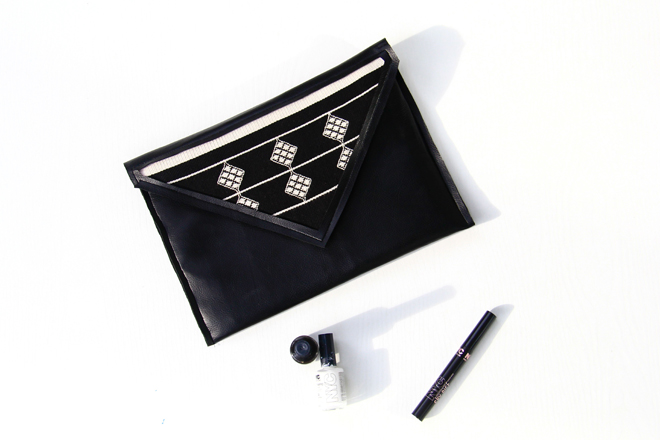
still looks fabulous.  This black faux leather clutch fits the bill.   It costs less than $5 to make and can be sewn in under an hour – the perfect afternoon sewing project!  I’ve even added a cutout to the clutch to display your favorite fabric.  I used some fabric left over from my up-cycled backpack project to make my clutch a one of a kind gift.

Materials:
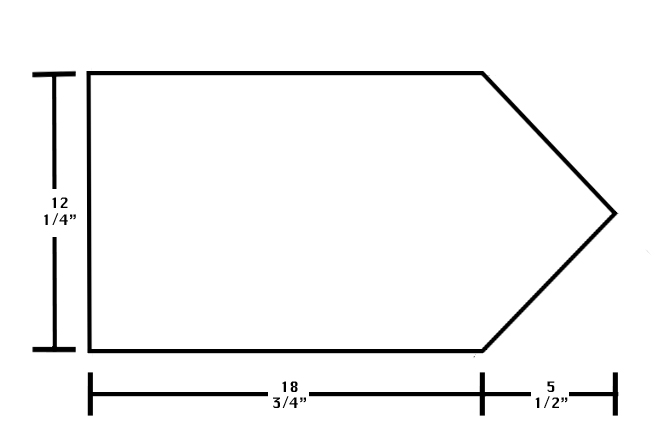
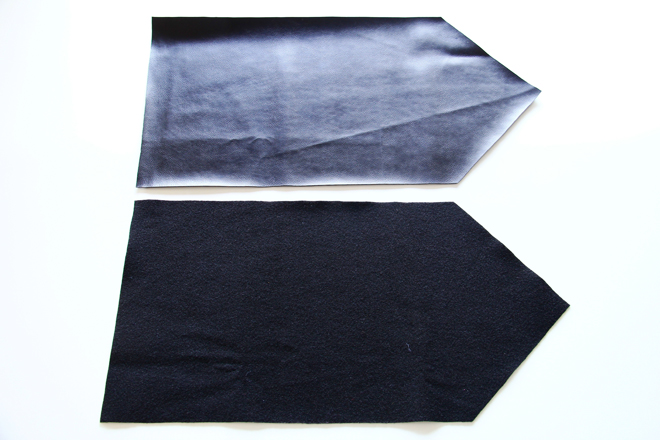
12 1/4" x 24 1/4"  Black costume pleather
12 1/4" x 24 1/4" Black felt
Contrasting fabric for cutout
Velcro
Fusible webbing
Cardboard / thin plastic folder
Black thread
Scissors
Sewing machine

Method:
1]  Cut 1 piece of costume pleather and 1 piece of black felt according to the measurements below.


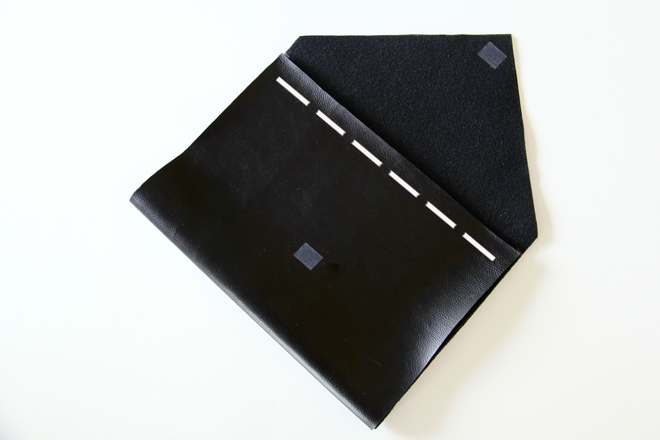
2]  Lay the felt on top of the pleather (wrong sides together), and fold it to form the clutch.  Use chalk to mark points where Velcro will be attached. 

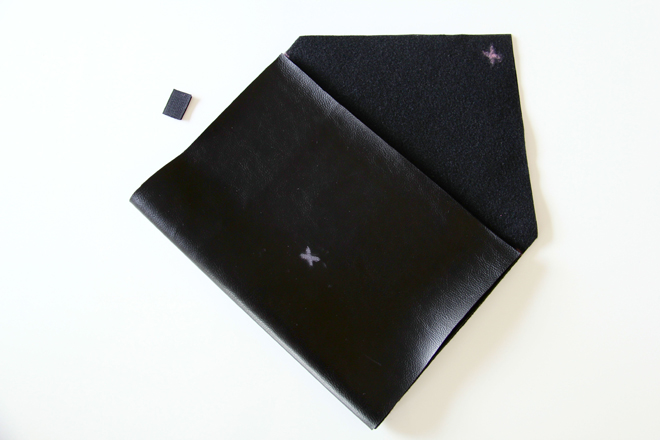
3]  Separate felt and faux leather and sew Velcro to these points.
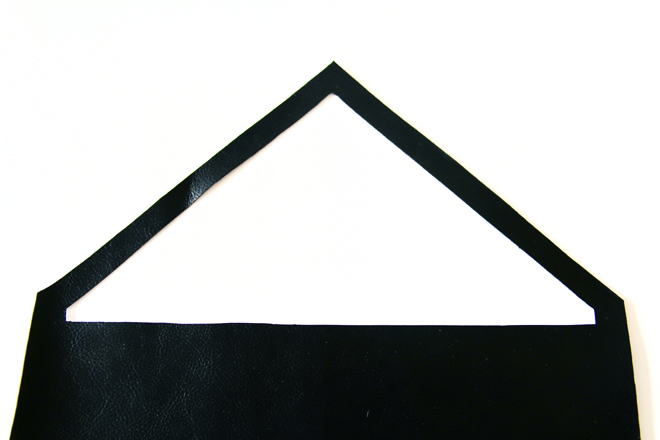
4]  Cut a triangular opening in the faux leather flap of the clutch, leaving a ½” edge on all sides. 

5]  Cut a piece of contrasting fabric and fusible webbing to the size of the flap of the clutch.

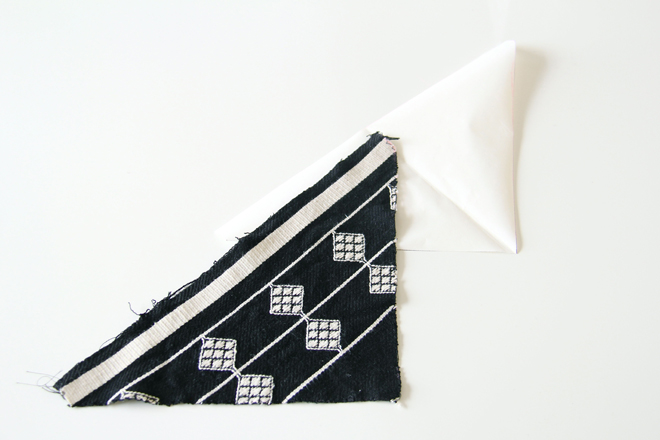
6]  Sandwich the fusible webbing between the wrong side of the contrasting fabric and the wrong side of the felt. Fuse fabrics according to manufacturer’s instructions.
7]  Line up the faux leather and felt and sew around the cutout.

8]  Cut a piece of cardboard/plastic 11” x 8”.
9]  Insert the cardboard/plastic between the faux leather and felt, positioning it in the front of the clutch. 
10]  Sew the front top edge of the clutch.

11]  Fold fabric to form the clutch.
12]  Sew side seams and you’re done! 

Take it out for a spin at your next Holiday party or gift it to someone special.  Please feel free to leave any questions/comments below.  If you enjoyed this tutorial please share the love by liking The Felted Fox on Facebook. Also, don’t forget to follow The Felted Fox on Bloglovin to receive free tutorials and patterns to your inbox.


Happy sewing!  Nicole.


Monday, December 1, 2014

FREE PRINTABLE CHRISTMAS CARDS


With Christmas just over three weeks away, it’s time to get the Christmas cards ready for posting.   Normally, we buy whatever we can grab at the nearest store and send them off at the last minute in hopes that they will arrive in time.  My parents in South Africa probably get theirs sometime in January (but they are too sweet to complain).  This year, however, I’m better prepared.  I’ve designed my very own printable Christmas cards, which I’d like to share with you.  There are three variations of the cards, peach, pink and teal.  Personally I like the teal, while my husband prefers the pink.  Which one do you like?

P.S.: My nursery décor and toy sale ends tonight.  Use the code “FESTIVE15” to receive 15% off all store merchandise.  Feel free to browse my store here.  Have a great week! Nicole


Please note: These cards were designed by me and should not be altered in any way without my consent.  They are for domestic use only and cannot be used for commercial purposes. Thank you.

Wednesday, April 23, 2014

CAGE DRESS DIY


Spring has reached Switzerland.  The trees are bearing leaves once again, the birds are nesting and there are tulips everywhere.  It really is a beautiful time to be in Basel and I’m savoring every moment.  It’s finally time to unpack my summer clothes.

I brought along a little black dress that had been hanging in my closet for many years.  It’s one of those handy dresses that you can cram into the smallest corner of your suitcase and doesn’t require ironing (I love those!).  After unpacking the dress, I decided that it could use some spicing up.  A little DIY was in order.  With just a bit of ribbon and thread I converted it to a “cage dress”.  Now it’s ready for a night out.

Clockwise from top left: Boutique Seven, BCBGMAXAZRIA, Rebecca Taylor, Nasty Gal.

Supplies
Little black dress
Black ribbon (width matching the straps of dress)
Scissors
Safety pins
Needle
Black thread
Matches
Dress form (optional)

Method
1) The first step in converting your little black dress into a cage dress is to cut a piece of ribbon large enough to wrap around your head.

2) Burn the ends of the ribbon (to prevent it from fraying) and sew together.

3) Pin the neckpiece in place.  Here it would help to have a dress form.  Unfortunately, I had to try the dress on and pin the ribbon in place.

4) Add a few cross pieces of ribbon, pinning and burning the ends as you go along.

5) Try the dress on to make sure the ribbons are correctly positioned.

6) Once you are happy, sew ribbons in place and remove safety pins.

Voila! Your cage dress is done.


Well the back of the dress could use some tweaking, but it will do for now.

Do you have a little black dress in your closet that you’re bored of?  Why not try and convert it into a cage dress?  If you do, send me some photos of your finished work.  I’d love to see the result.  Till next time… Nicole.
UA-39822949-1