




While visiting Denmark last
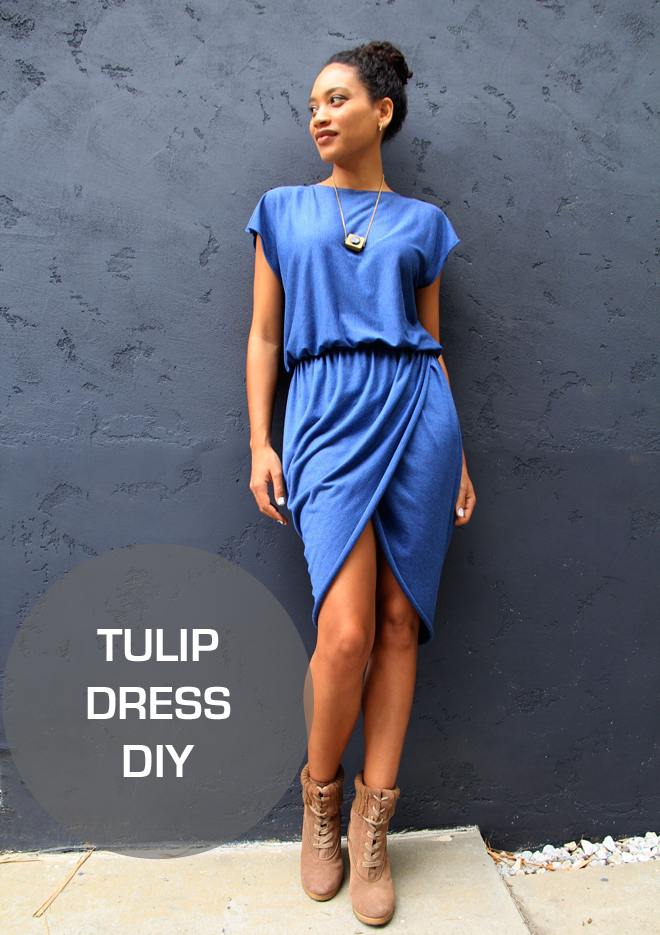
spring I noticed this knit tulip dress at the boutique store, Moxy-Copenhagen. It had everything I searched for in clothing
but usually can’t find: something that looks amazing, is super comfy, and
doesn’t need to be ironed. On closer
inspection the price tag read DKK 799.99
(that’s nearly $140!), a little out of my price range. A little disheartened, I quickly snapped a
photograph thinking I would DIY this dress someday. Well, that someday has arrived!

I was able to make this tulip
dress for around $15 and invested about 2 hours in measuring, cutting and
sewing time. Because it’s made of knit
fabric, I left the edges unfinished. My
version of the dress has less draping around the waist area and hugs my hips a
little tighter. If you prefer a looser
fit, you could easily add a few extra inches of fabric to the skirt or have
less of an overlap in the front.
Supplies:
At least 2 yards of knit
fabric (depending on your measurements)
Matching thread
1” Elastic (enough to
wrap around your waist)
Tailor’s chalk
Fabric scissors
Sewing machine
Method:
1] For the tulip shaped
skirt, cut a rectangular piece of fabric measuring 36” by (the width of your
waist x 2).
2] Fold your fabric in half
widthwise.
3] Mark the selvedge edge
of the fabric 15” from the top of the skirt.
4] Draw a curve from the
top of the fold point to the 15” mark.
5] Draw another curve from
the bottom of the fold point to the mark (See diagram)
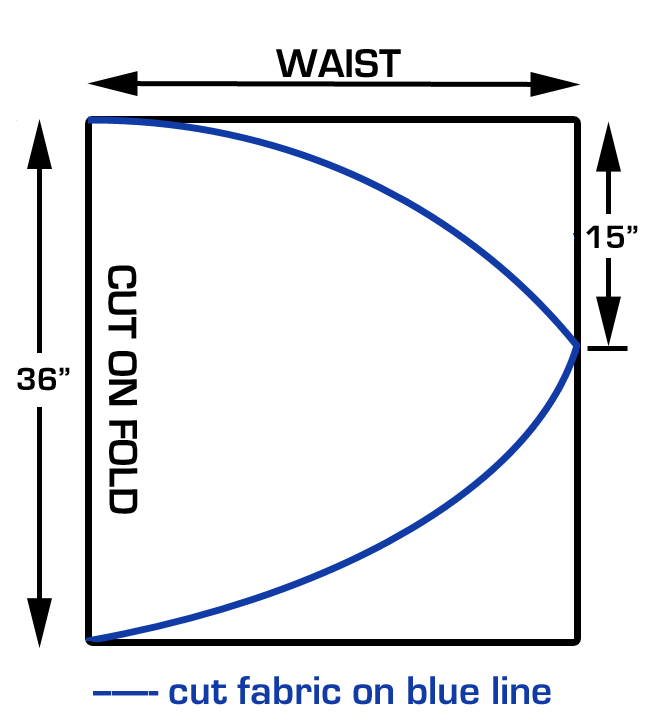
6] While still folded, cut
fabric along these curves.
7] Baste stitch two rows at
the top of the skirt.
8] Gather fabric evenly,
until the skirt measures 1.5 times your waist.
9] Cut elastic 1” shorter
than your waist measurement.
10] Overlap the raw edges of
the elastic and sew together.
11] Pin the gathered skirt
to the elastic. Make sure that the front
gathered panels overlap evenly in the front, and end on either side of your
waist (where you would usually have a side seam).
12] Sew the elastic in place
using a zigzag stitch.

13] For the top, cut another
rectangular piece of fabric 42” x (waist
measurement + 8”).
14] Fold the fabric in half
lengthwise so work measures 21” x (waist +8”).
15] Draw an 8” line across
the fold, centering the line.
16] Draw a 1” line from the
center of the fold down the front of the top.
17] Draw a curve from one
end of the 8” line to the other that is at least 1” wide at the center point.
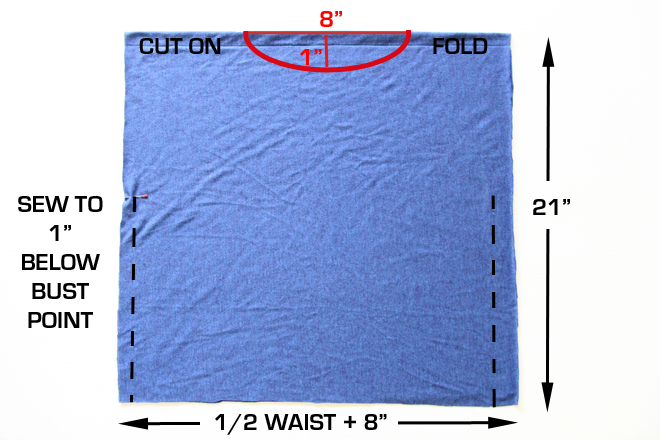
18] Cut along the 8” line
and the curve to form your neckline. 19] Only cut the front of the top, NOT the back.
20] Mark a point on either
side of the top 1” below your bust point.
21] With right sides facing,
sew a ½” seam along the sides, ending at the marked point. Try on the top to see if
it fits correctly or if it needs to be shortened.

22] Baste stitch two rows at
the base of the top and evenly gather the fabric until it is the width of your
waist.
23] With right sides
together pin the top to the skirt. Make
sure that the front center of the top aligns with the front center of the skirt.
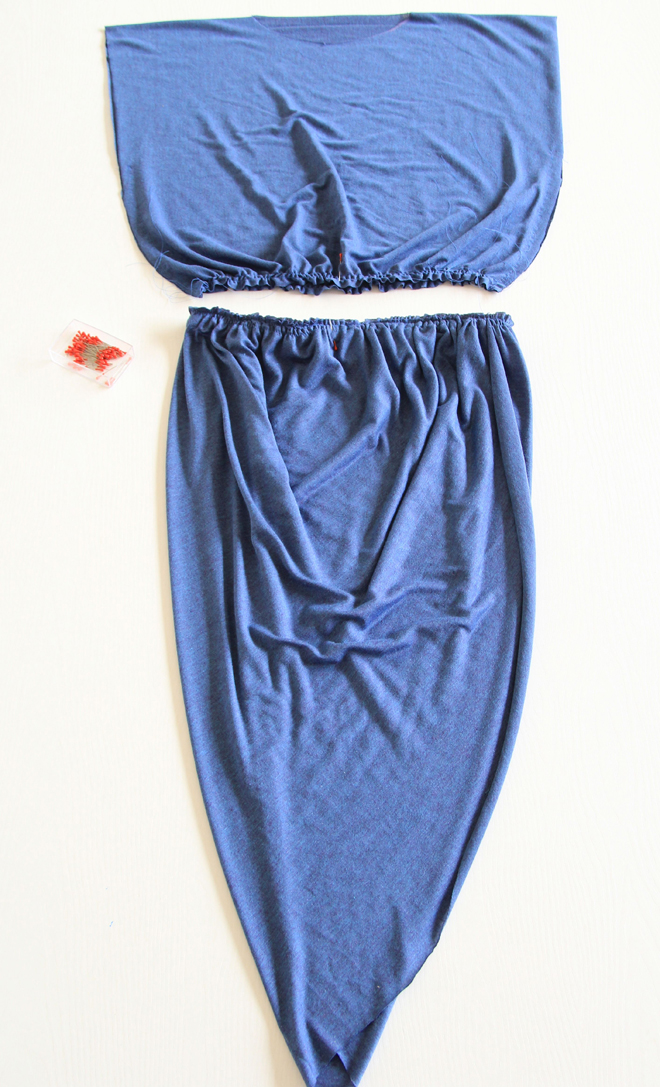
24] Sew top to waistband
using a zigzag stitch.
I am really happy with my
new tulip dress and intend to make a few more in fall appropriate colours.

Before I leave you, I’d
like to share some more exciting news--well exciting for me anyway. J I’ve just
launched my own Etsy store!! The Felted Fox Shop sells handmade children’s felt dolls and nursery accessories. It’s still in its infancy, but will grow with
time to include more of my designs and pdf patterns in the future. Here is a sneak peak. If you’d like to see more hop on over to my store.

Please feel free to
leave any questions/comments below. I do so love hearing from you. If you enjoyed this tutorial, please share
the love by liking The Felted Fox on Facebook. Also, don’t forget to follow The Felted Fox on Bloglovin to receive free tutorials and patterns
to your inbox.
Happy sewing! Till next time, Nicole.